Showing posts with label teapots. Show all posts

Thursday, November 8, 2012

New Pots


Cobalt blue decorated ornaments
 I am excited to be debuting some new pots for the kiln opening and farm tour this Saturday.  It's very comforting to be sharing my new pieces from my first kiln and to be sharing about our farm with our customers, neighbors, and friends. I'm feeling more confident with my pots now that I have a kiln to focus my energy on!
Cobalt blue decorated ornaments
Last year I played around with throwing stoneware round ornaments on the wheel, but had some difficulty getting them thin enough so they wouldn't weigh the branch down. This year? Slip casting. I'm slip casting porcelain for the time being, but having a grand time decorating them and they turned out so well in the wood firing and took to the salt really well.
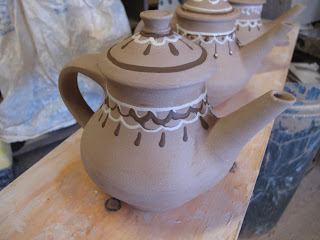
Decorated teapot
I've never been terribly inclined to make teapots, but had a burst of inspiration recently which led me to make a small herd for the opening. I'm excited to try some scratch decoration with cobalt blue and a few different lid styles.
Teapot dipped in brown slip
Should teapots and ornaments and other pots lure you out on Saturday, I made a double batch of  Emmajean Creamer's famous chocolate chip cookies! My grandma's recipe is DELICIOUS!

Monday, November 5, 2012

Kiln Firing for Kiln Opening

Kiln loaded up!
In getting ready for our farm tour and kiln opening I worked really hard to get another kiln fired. I made some special pieces for this firing including some teapots inspired by a recent accession at Colonial Williamsburg:
Raw teapot paint decorated with blue slip

Raw clay teapot with a scratched design and cobalt blue decoration
As well as some ornaments:
Small herd of decorated ornaments

The ornaments I am really excited about because they are slip cast porcelain, making them hollow. Next year I hope to have time to modify my stoneware clay in order to slip cast with my own clay and have stoneware ornaments, but with the limited time I had this year I went with pre-mixed porcelain. I did make some pieces of kiln furniture to prop them on, and when they come out I'll explain more about this. Here is a photo of a few shortly after finishing the kiln firing:
Here are a few other shots of the inside of the kiln while I was crash cooling:
Ashy salty wine cups!

Decorated stoneware mugs through a haze of flames


Wednesday, February 22, 2012

Teapot Challenge


Should you be looking for a good challenge, learn how to make a vessel in the manner by which another potter does. Same tools, same techniques, same weight of clay. Try teapots. Joseph had been making some teapots last week and I was watching him, seeing how he attached his spouts, made the lids, etc. By the end of the week I decided to make a few of my own, and as I went to make the teapot, Joseph said to make it in the same shape as his. This bellied-out base is somewhat harder to achieve than it may look. It certainly fooled me! I went through about 15 teapots before I really started getting the hang of it and stopped making the walls too thin!
Spouts thrown off the hump

Joseph also has a different way of making spouts than what I was used to, so that was a bit of a late-evening nightmare trying to get the hang of it. Nothing really major to describe, just the shape, thinness, and throwing off of the hump was a lot to control!
Lids

So I got the shape down pretty well (FINALLY), made the lids and let everything dry out a bit before assembling and putting handles on them.
Teapot bodies with spouts
Today I got to decorate the little beasts and was very pleased with the decorations. I am excited to see the results. The darker slip is a manganese slip and should be blackish-brown. The two teapots with slip trailing over most of the upper-half will be glazed entirely in a yellow/brown ash glaze. All of these are going in the salt kiln in April.

Here are my decorations in detail:


I attempted to layer the slips in order to see what the colors would do over one another

I even put a little swirl-action on the top of the knob!