Wednesday, December 29, 2010

A Loving Present

I've been anticipating the day I could share this with you all! Several friends recently had this beautiful bundle of joy named Nora:

When I heard they were expecting, I immediately started plotting the perfect baby present. What better thing for a pair of antique scholars than a modern-day loving cup?


Nottingham area loving cup from England, dated 1812. I really enjoy the incised lines and the roulette decoration on this.
http://www.petworthantiquecentre.co.uk/dealer-products.asp?pid=618&did=26&dealername=Deborah+Serpell
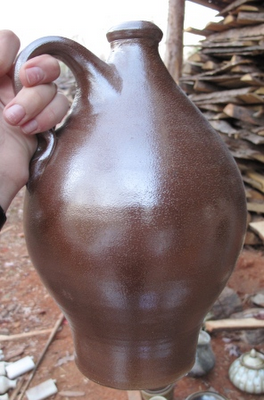
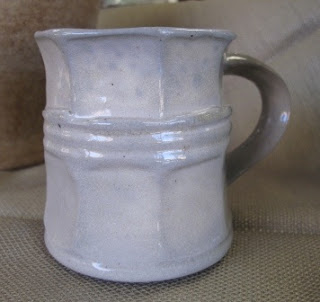
Historically, the loving cup was a two-handled vessel often presented for births, weddings, or other commemorative events. The equivalent would be a trophy by today's standards. In the ceramic world, the loving cups were often scratched with decorative motifs, dates, and names (not always!). I especially enjoy the ones made around the area of Nottingham, England which produced a rich brown salt-glazed stoneware.  Here is the version I made for Nora:


I did not extrude the handles, as I currently do not have an extruder, and wanted to try pulling a thinner handle to see how it would look.

Around the rim I used metal stamp letters to write a note to Nora:

The stamps read "Welcome to the World Nora"
I made a second one as well which had a larger rim, but chose to give Nora the more proportionate one. Or, as someone pointed out, if Nora ever knocks it off the shelf, I can send her the second one! Here is the second version:


While the piece above has a higher rim than the other, I felt that with the placement of the handles, and the fact that the handles were pulled, made the other one look more proportioned. I thought (and hope!) this was a very loving gift to give to a very lovely little girl!

Sunday, December 26, 2010

Ring Vases

For over five years I've been fascinated by ring bottles and the process of throwing a ring on the wheel.
Historically the supposed ring flask, or harvester's bottle is a culturally and socially interesting tidbit, but I say "supposed" because I don't know whether I agree with how these were used historically or not. I've yet to see one archaeologically, but admittedly, I have not really been looking! One piece which has been stuck in the recesses of my mind since I was in Germany several years ago was this finger vase:
German gray salt-glazed stoneware. Museum für Angewandte Kunst, Cologne, Germany

Close-up of vase. Museum für Angewandte Kunst, Cologne, Germany/
I can only aspire to something as beautiful as that! Who knows, maybe I'll try that too. I have also been thinking about getting some cake decorating tools in order to add decoration. I had seen a potter's work that had used cake decorating implements (it probably helped that she had worked in a cake shop) and it was really fascinting.
 So I finally got up the guts (or gumption) to give ring bottles a try! Watching Michelle Erikson recently working on a molded bottle and looking at Sid Luck's ring bottles lately have been an additional motive. I've combined the ring bottle with a five-finger vase form and made ring vases. I don't know whether they will be functional or popular yet, we'll have to wait until they're fired. Next time I throw them I will try to take some photos or video of the process. But I have put some photos below of the results:


I'm also plotting variations on the finger vase and other small vase forms, so I will keep you posted!


Wednesday, December 22, 2010

Feeling Kind of Official!

I felt like an official potter yesterday when I arrived home to find a box sitting on my front step. Within it, I found the postcards I recently designed and had printed. So, for your viewing pleasure, I present to you, Liberty Stoneware's first official postcard!
Front side of postcard

Back side of postcard
As a final note, I hope you all have a wonderful holiday, or that you are having a wonderful holiday season already. I look forward to sharing more adventures with you in the new year.

Friday, December 17, 2010

Tinkering with the Teapot

I apologize if I am driving anyone crazy with my alliterations. I am fond of them, but I'll try to vary it from now on!
On to teapots.
I made a teapot on the wheel last weekend, and finished it up the other night. I have not made a prolific amount of teapots, so I thought I would share the components of my new adventure into the world of teapotting. Here are the components of the teapot separated (well, okay, I didn't get the camera out until after I put the handle on and had finished the lid):
Teapot body, spouts, and lid.

Finger loop for the front of the teapot and spouts.
The lid before I trimmed it and threw a knob on top looked like this (as a note, this example lid is the second lid I had thrown. Always throw in multiples!):

And before it got trimmed on top of the teapot, the lid looked like this:

I sized up the spout, made a few marks and moved it around a bit. Then I temporarily stuck it on the side to see if it looked right:

After I decided it was placed correctly, I punched the holes for the liquid to pour out (sorry, no photo, I forgot!) The base of the spout got a little squished when put it on, not to mention that a straight spout on a faceted teapot looked a little out of place. So, after I put the finger loop below the spout I had some extra clay on hand, and I added some little bits around the edge of the spout:

The final product:
I think I am going to angle the sides in a little more, and maybe tame the knob some. I'll keep you posted. Happy potting.

Thursday, December 16, 2010

Surmising Saggars

Saggar. Courtesy, National Park Service, Colonial National Historical Park, Yorktown Collection 
Another fascinating aspect of the William Rogers kiln site were the saggars used for firing mugs and tankards (and possibly bowls and teapots). My title is intended to imply that none of this is indefinite or proven, and any comments or additional information is always appreciated! I say that saggars were used for firing mugs and tankards because that seems to be what the archaeological evidence shows (at least at this site, and for this moment until I research more and reconsider). The saggars varied in height and size, but seemed to correspond with most of the tankard and mug sizes. All of the saggars were wheel thrown, circular in shape, with a heavy rounded rim. There are also several saggars which I did not get to examine in this go around which have tankards adhered to the interior floor of the saggar.  I've included some photos I took at the Potteries Museum in Stoke on Trent, England which shows this unfortunate, but somewhat humbling, result.

Tankard adhered to interior floor of saggar. Potteries Museum and Art Gallery, Stoke on Trent, England.

Teapots adhered to interior floor of saggar. Potteries Museum and Art Gallery, Stoke on Trent, England.
I would basically argue that saggars held more refined wares which may not have stacked well or would have been more vulnerable to the environment in the kiln. Saggars were used to hold groupings of smaller objects so as to maximize kiln space. This also allowed for better stacking of objects in the kilns because, in general, kiln shelves were not used.

Interior of kiln in Stoke on Trent, England, showing how saggars were stacked on top of one another. Gladstone Pottery Museum, Stoke on Trent, England.
It would appear that the saggars were also designed to accomodate the handles of tankards. Or, to accomodate lowering the tankard or any other vessel into the saggar. An opening, usually about 2 inches across was cut into most of the smaller saggars which may have only accomodated one or two pieces. I could be completely wrong about this idea.
Large opening cut into one side of the saggar. Most of the openings went all the way to the base of the saggar. Courtesy, National Park Service, Colonial National Historical Park, Yorktown Collection 

Another large opening cut into a saggar, different size than most of the others, and the opening did not go to the base of the saggar. Courtesy, National Park Service, Colonial National Historical Park, Yorktown Collection 
Holes were also cut into the saggars to allow the salt to enter the saggar and cover the ware. Most of these holes were teardrop-shaped, but there were also a few which had triangular holes cut into them.

Teardrop-shaped opening on saggar. Courtesy, National Park Service, Colonial National Historical Park, Yorktown Collection 

Triangular-shaped opening on saggar. Courtesy, National Park Service, Colonial National Historical Park, Yorktown Collection 
There were also these pieces, which in the archaeological catalog were called "saggar lids." While many of these did correspond with the tops of the saggars, it would also appear that these basically acted as large pads between saggars and other pieces, to shore up heights and level out the stacking.  The archaeological report for the William Rogers site says that the lids were only used on the uppermost saggar after the saggars were stacked one on top of the other in a column (similar to the photo of the Gladstone kiln above). However, because many of these "lids" had other "lids" or bits attached to the tops of them, I wonder if that was really the case. The edges of these "lids" were beveled, and it appeared that one side was consistently used as the top and one as the bottom. This is because one side of each "lid" had much more salt and wear than the other. The bottom part of the "lid" which would have sat on the saggar was the wider part. The bevel likely kept the salt from catching and collecting on the saggars.
"Lid" for saggar. Courtesy, National Park Service, Colonial National Historical Park, Yorktown Collection 

"Lid" for saggar. Note the beveled edge. Courtesy, National Park Service, Colonial National Historical Park, Yorktown Collection 

Saggar "lid" showing that the pieces were not directly stacked one on top of the other. Courtesy, National Park Service, Colonial National Historical Park, Yorktown Collection 

Wednesday, December 8, 2010

Slipping into the Studio

People crave lots of things. Tonight, I had a craving for clay. Not to consume it, just to play with it. So I broke away from everything I was supposed to be doing, and went to the studio. While I was not incredibly productive, it felt good to get on (okay, behind) the wheel.

I mostly made some mug forms. I did this intentionally because now that means I have to go back sometime soon to put handles on them!
I tried something new, too (well, new to me). I have been thinking about little vases lately. Mostly about how much texture you could pack into a small vase, and how popular they might be. I think I might add feet to the wider based vases pictured below.
They are only about 1 1/2-2" in height. I threw them off of the hump (off of a larger ball of clay)

Sunday, December 5, 2010

Eighteenth-Century Kiln Wadding


A box of kiln wadding. Courtesy, National Park Service, Colonial National Historical Park, Yorktown Collection 
Next time you go to wad your pottery for a kiln firing, think of the William Rogers pottery factory in Yorktown, Virginia. William Rogers was the proprietor of the pottery, which operated from the 1720s until circa 1745. William Rogers is often referred to as the "Poor Potter" of Yorktown. This was due to a 1732 report written by Governor Gooch of Virginia which said "As to manufactures seet up, there is one poor Potters work for course earthen ware, which is of so little consequence, that I dare say there hath not been twenty shillings worth less of that comodity imported since it was sett up than there was before." This report was not exactly telling the truth, and in fact, William Rogers' production was quite lucrative, reportedly selling as far as New England (see the 2004 Ceramics In America publication for two good articles on Rogers). This site produced both earthenware and stoneware vessels. I had the pleasure last week of looking over the kiln furniture and some of the archaeological material from the stoneware kiln site. One of the most fascinating things to me was to handle the wadding and props from the kiln.
Courtesy, National Park Service, Colonial National Historical Park, Yorktown Collection 
For those who do not crouch in, stand next to, or crawl around in kilns loading pots, wadding is a basic component which (in modern recipes) usually consists of kaolin, alumina hydrate, and sometimes grog, or heavy sand.
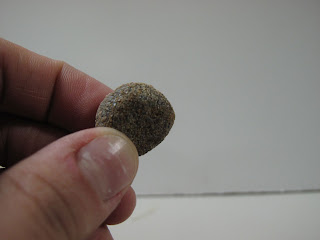
You can see the texture of the sand on this small piece of wadding. Courtesy, National Park Service, Colonial National Historical Park, Yorktown Collection 
Historically, it would seem that many potters used their basic clay combined with grog. Wadding basically acts as a buffer between the pot which it is put underneath and the other vessels or kiln furniture. It basically keeps the pot from sticking to everything. Very handy in a salt-glaze kiln, which the William Rogers site was. And, historically, kiln shelves were generally not used, so pieces were often stacked one on top of the other. 
This is the base of a tankard. You can see the small orange-colored spots which are where the wadding was placed on the tankard before it was fired. Wadding typically leaves little marks like this. Courtesy, National Park Service, Colonial National Historical Park, Yorktown Collection 


This is the interior floor of a saggar. You can see the orange-colored markings where there were vessels propped up. My estimation is that this saggar held mugs with three pieces of wadding on each mug. Count up the little marks and you can kind of guess where the mugs were sitting! Courtesy, National Park Service, Colonial National Historical Park, Yorktown Collection 

Wadding usually has no particular shape, and is often just grabbed and made into whatever shape is necessary for the vessel, be it a small ball, a square pad, or a fistful. There were quite a few fistfulls in the collection, which was really fun to hold and see the fingerprints of the potters. 

A fistful of wadding with my fingers in the same place as the original potter. Courtesy, National Park Service, Colonial National Historical Park, Yorktown Collection 
 There were some pieces of wadding which I thought may have been used in a particular way, and connected to some of the archaeological vessels I looked at. Take a look at this bottle, and notice the marks on the shoulder of the bottle where my fingers are.

Courtesy, National Park Service, Colonial National Historical Park, Yorktown Collection 

Courtesy, National Park Service, Colonial National Historical Park, Yorktown Collection 

Courtesy, National Park Service, Colonial National Historical Park, Yorktown Collection 
There were likely wads or pads there, and this may have been the shape of the wadding:

Courtesy, National Park Service, Colonial National Historical Park, Yorktown Collection 
I say that because if you think about sitting something on the shoulder of the bottle, a triangular piece of wadding would work really well for support. I could be wrong here, I'll have to test my theory once I get a kiln built!
Happy wadding.


Wednesday, November 24, 2010

The Results

There they were, strewn out on the ground as if a shipping crate had just toppled and everything fell out intact. I approached cautiously as I was surprised by the appearance of many, and in awe of most. I was surprised by the turn out of the Danish White clay body which I showed in a previous post from another kiln firing.
On the left is the Danish White clay body from Joseph Sand's kiln firing, and on the right is the Danish White clay body from Sid Luck's kiln firing
I had never seen Danish White turn out like this! It was not as chocolaty as some of the other clay bodies, but it was toasty! It had some great flashing patterns from the flame though, and showed a good deal of surface variation. Everything was very shiny, and the Aurora clay body turned out very nicely. This made me think a lot about how long a kiln sits in reduction and how much variation there can be regarding reduction in such a large kiln. Reduction draws the iron that is in the clay body to the surface, which means the Danish White clay likely has more iron than I had previously thought!
Bottle made with Aurora clay body
Overall, I was very pleased. As I clean up the pots and get them photographed I will try to post more detailed results on my Facebook page.  I did make me take a mental note for what clay bodies to consider should I get the chance to fire in this kiln again. Or, it will give me the chance to try another white clay body to see how that turns out!
On another note, I had the opportunity to meet Anne Pärtna and Adam Landman from Blue Hen Pottery this past weekend. We talked about being gypsy potters and going from kiln to kiln and gaining an understanding of the variations of clay bodies and kilns from firing to firing. It was humbling and made me think about a more constructive approach to figuring out how to get pottery fired and just having reserved bisque ware on hand.

Saturday, November 20, 2010

Feature Artist, Third Friday Artwalk

I was able to retrieve a few pieces from Sid Luck's kiln firing last weekend. The results were splendid, I was especially happy with how the Danish White clay turned out.
A few pieces from Sid Luck's firing
The results of a clay called Danish White, which is a clay I enjoy a lot
I had the opportunity to be the feature artist at the 3rd Friday ArtWalk at the Arts Incubator in Siler City yesterday. I set up a small collection of pieces, and will be adding more in the coming week.
My display at the North Carolina Arts Incubator
There was a steady crowd for the whole evening, and Sue Baker, a sculptor at the Incubator, did a live demonstration, working with a live model. The model was painter and ceramic artist Ricky Lindley's daughter. People were really excited to see the demonstration.
Sculptor Sue Baker drew quite a crowd for the basement of the Incubator!


Sue Baker modelling Ricky Lindley's daughter

Joseph Sand is going to start opening his kiln tomorrow, so I will try to post some photos for a Thanksgiving treat! And, if you're near Siler City, stop in and have a look at my pottery and let me know what you think!