Showing posts with label cobalt. Show all posts

Monday, February 22, 2016

Dreaming About Dishes


I used to dream in German when I was studying the language in college. Now I dream about pots on occasion, and sometimes the dreams are so vivid they stay with me and then I have to make them come true.
 I have been thinking about Helios clay from Highwater Clays and the fact that it salts well. So, I had a dream about a few tests with low, somewhat wide dishes with no glaze on it when it goes in the kiln to test how well the salt may sit on a flat surface of Helios.
I also wanted to see what the cobalt slip would look like in an abstract pattern, and to top it off, made a ruffly rim. If all goes well, I will fire the kiln up in a few weeks and see what happens!
Glazed too late and the wall separated

Glazed the interior and exterior too soon and the wall collapsed

It's nice to be dreaming about pots since my pots have been putting in my place in my studio. The battle of the heat vent has been going on for some time, and trying to keep things just right under the plastic has been somewhat disastrous. I posted the above photos on Facebook recently of what happens when you a.) let a pot sit too long and then glaze it and b.) rush things and glaze the interior and exterior too soon.
Nice, thin wall!

The plus side of that was getting to see the nice, thin walls! In closing, I dreamed about a pitcher/vase form the other night so stay tuned!

Tuesday, October 15, 2013

Kiln Opened

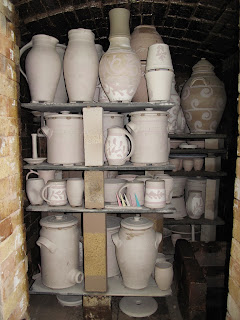
The results are in and after a suspiciously smooth firing on Sunday, the pottery looks pretty good!
A few cracked pieces near the firebox openings from some early spikes in temperature, but the shelves are not warped, and everything looks great! I'll try to get some individual photographs of pieces later in the week.


Friday, July 19, 2013

Recent Kiln Firing

 When I built the kiln last year I said, "my goal is to not fire this thing in July or August." The first firing last year was in August and we just did a firing in July. So much for that hope!

I loaded the kiln a little differently this time, which ultimately bit me in the butt, however, it was worth a try I suppose.
Rather than putting the shorter shelf in the front of the kiln, parallel to the front firebox opening, I placed it there on the left, and then lined up the 12x24 shelf in front of it.
What I realize in hindsight is that this essentially created the same atmosphere I struggled with for the first several firings, having the large shelf up front, creating a cooler space in the front corner.
See how the pots in the front left are dry? That's the cool corner. We also struggled a lot with this firing. Up until this week we've had fairly constant rain for almost three months, which has brought us high humidity levels, given me damp bricks, damp shelves, and never drying pots. It didn't matter where I put them, or kept them out of the elements, everything got damp. Including some of the wood. We fought and fought with that kiln at the end and gave up (or gave out really) before I would have normally called it good.
Coolers
I was pleasantly surprised by the results. For the most part, everything reached temperature, and I only had a few issues with dry ash or really dry pots.

Nose dive mug
Only one piece made a sacrificial nose dive during the firing. 

On to the next firing!


Monday, February 4, 2013

Blank Slates

Playing with some new (to me) stamps on crocks

 There has been a flurry of activity in the studio lately in preparation for a kiln firing. I had to push the firing back one week as I started a new part time job last week. Very exciting, it has just meant having to make some adjustments!
Three bowls with low wide centers for stacking and serving
I am working on a lot of decorating as the pots are all mostly dry. Blank slates always bring a bit of indecision. I am a fairly indecisive person as it is, so committing to something that does not wipe off very well to make a clean surface can be difficult!
Decoration on the dish set
Lidded jar
Jars are particularly tricky. I think this might be because with three small handles on the piece, there are essentially three "sides" to fill on the surface. That is unless I were to make a continuous pattern around the whole piece. I chose to go with the three "sides," all decorated with a similar pattern.

Just small wine cups and condiment dishes to make in the next day or so and then I will start loading the kiln soon. Lots of work, but always worth it!

Thursday, April 12, 2012

Experiments

Small herd of experiment mugs!
 I overheard someone recently saying that if an experiment of some kind is not going in every one of your kiln firings then you are not moving forward as a potter. It is an interesting perspective, and true in many respects for always challenging oneself and trying new things. This upcoming kiln firing at Joseph's will have a lot of experiments in it for me. Some recently made experiments are these mugs which have a white ground beneath my cobalt blue decorations.


I am hoping that like the previous kiln firing at Joseph's where I first tried this out a little bit, that it will be a shiny white ground with bright blue on top. The blue may blow out a little bit, but I am hoping they will be spectacular and I will certainly take the lessons from my experiments to my kiln when I get it built! 
Small mug with white slip beneath the cobalt blue decoration. Bare clay body surrounds it with salt-glazed surface

Dish rim with white ground under cobalt blue decoration

Saturday, January 21, 2012

Decorating Bowls

 I mentioned making a new form this week and I finished up a few yesterday. I have based the shape off of 19th-century American milk pans. Because I have not put a lip on the rim though, I am not going to call these milk pans, and will just refer to them as bowls. That is, unless someone has a better idea! I wanted a shape that could be versatile either as a bowl for mixing, for putting apples or other items in, or for flower arranging. I think this shape might fit the bill.
I put big handles on the sides:
And then put some decorations on:

I made sure on most of them not to cover up the stamped letters. However, historically, most potteries that stamped their wares and did cobalt decorating did not seem to let this get in their way. Is it an aesthetic faux pas to cover up your shop name? Here is one bowl I did cover up the lettering, and I kind of like it. I also this this gives more room for larger designs.
Getting back to making some videos, here is a video of me stamping the bowls:


And here is a video of me painting the bowls:

Tuesday, November 22, 2011

Slip Testing

In getting ready for Joseph Sand's kiln firing I made a bottle in order to test some slips in his kiln atmosphere. Normally most of my pottery has turned fairly dark in the reduction, so I put a layer of white porcelain slip as a base all over the bottle. I then carved away at some points to reveal the clay body. Then I painted with cobalt blue slip and a red slip.
The red slip which looks reddish-brown in the photo below turned very brown in the kiln and reacted well to the salt.
Red slip on the flower at the base

Results of the red slip
The blue slip which you can see on the leaves at the top of the bottle worked out really well over the porcelain slip. The blue slip looks purplish-gray in the photo below.

Blue slip looks purplish-gray at the top of the bottle

The blue followed the path of the flame
The carved away area had some nice orange-peeling where the salt glazed the surface.
Overall, the bottle was wonderful, and I was happy with the results. Now to decide whether to hold on to it for a little while or sell it right away!


Sunday, July 17, 2011

Pitcher Party

After a recent sale, I noticed that I was running low on pitchers. So, last week, between hosting family and friends, I had a little pitcher party and made a few, with the hopes of making more in the next couple of weeks.
I made sure to make some twisted-handle pitchers, as I am completely out of them!
Twist handle
When I pull my handles, I tend to put the pots upside-down on the edge of table. This allows for the handles to keep from slumping, and it allows me to clean up the bottoms and put my stamps on.

Upside-down pitchers

Stamps

Row of hanging handles
I have also been thinking about a taller pitcher with a lid in order for it to be put in the refrigerator, or placed on a table without allowing anything to fall into the mouth of the pitcher. I also put a wide base on these in order for them to sit in the refrigerator, with wire racks or with glass shelves.
New, larger pitcher

Pitcher with lid

Lid
I put a strap handle on the front in order for the weight of it to be balanced when pouring.

Strap handle at the front of the pitcher
I had fun decorating these as well, and put the Liberty Stoneware stamp on the front. I cannot wait to see these in a salt kiln!
Cobalt decoration

Cobalt decoration

Stamp and strap handle